A Lil Goth
Materials
PSPX 4
Or any other version will work!
Scrapkit
Awesome kit "A Lil Goth" by Mellie Beans, This kit is jammed packed with wonderful elements and no duplicates, gives you more to play around with!
HERE
Tubes of Choice ( you will need a tube that has a Close-up)
A fabulous tube by Ismael Rac "Goth" and "GothicDoll"
HERE
Mask of Choice
HERE
Filters of Choice
Xero Porcelain
Font of Choice
Deutsch Gothic
HERE
Add your drop shadows as you go!
Here We Go!
Open New Image 700 x 700
You can crop once your are done!
I am using 2 tubes, but you can use one only if you would like...Just make sure you have a closeup of your tube choice
Take your tube of choice
re-size to 90, copy & paste onto your canvas
Take Frame 1, re-size to 80
copy & paste right behind your tube
Take your magic wand, click inside frame
Selections-Modify-Expand by 5
Take your closeup
copy & paste behind your frame, position to your liking
Selections-Invert-Delete
**KEEP SELECTED**
Take your closeup again
copy & paste, position to you liking
HIT DELETE again
Selections None
**make sure your closeup tube layers are behind your Frame 1**
Go to Layers Palette and Merge Down
your closeup layers
I took 2 colors from my tube to make a gradient
You can also use Texture, or use one of the papers from the kit
Make it your own!
Go back to your Frame, Magic Wand, click inside frame
Selections-Modify-Expand by 5
Layers-New Raster Layer
Floodfill with your choice
DESELECT
Again, make sure this later is behind Frame and tube layers!
Lets play around with those Filters/Blends!
Go to you Layers Palette, find your closeup tube layer
Right Click-Duplicate
Still on this later
Go to Adjust-Blur-Gaussian Blur-6.0
Layers Palette-Properties
Blend Mode Screen
On my original closeup tube layer
Properties
Blend-Mode Luminance
Opacity 46
You can always play around with your blends till you get it to where u want!
Now lets add those elements. This kit has so many beautiful ones I wish I can use them all!
Take Element 3, re-size to 30 copy & paste right in bottom of tube
Take Element 2 Re-size to 60
Adjust - Sharpen More
copy and paste right behind Frame only
Taking your Eraser Tool you can erase an excess of the Element
Take Element 10 re-size to 50
copy & paste and place right in the center bottom of frame behind tube
Take Element 37 re-size to 30
copy & paste, place at the bottom of your tag
Take Element 39 re-size to 30
copy & paste place at bottom of your tag
Take Element 42 Flower, resize it small and just place a few anywhere at the bottom of your tag
Tke Element 40 (ball and chain), re-size to 60 copy & paste to the bottom right of your tag
Go to layers palette duplicate that layer
still on your layers palette move the copy of that layer in front of tube
We want to make t look like the chain is going around her arm
Get your eraser tool and erase some of the chain on her arm
You can see my tag for reference
Take Element 21, re-size to 20
Image-Flop Vertical and place to the right bottom behind tube
Take Element 19, copy & paste on either side of your Frame
Layers Palette, Right Click Duplicate
and place the other later on other side of Frame
You can add more lements if you would like!
when you are done
Go to your MAIN tube layer
Layers Palette-Right Click-Duclicate
On your copy tube layer
Adjust-Blue-Gaussian Blur 3.0
Back to Layers Palette-Right Click-Prioperties
Blend Mode Hardlight
But you can always play around to find the one that works for you!
Once you are happy with it, Merge Visible
Add your Mask of choice
Once finished a gave my tag a blast of Porclain!
Add your Name, License and Copywrite Info and save your tag as PNG!
Hoped you enjoyed my Tut!
I would love to see anything you make with it
Latinangel1964@aol.com

Calming Beauty
Materials
Program
PSP X4
Any any other version will work
Scrapkit
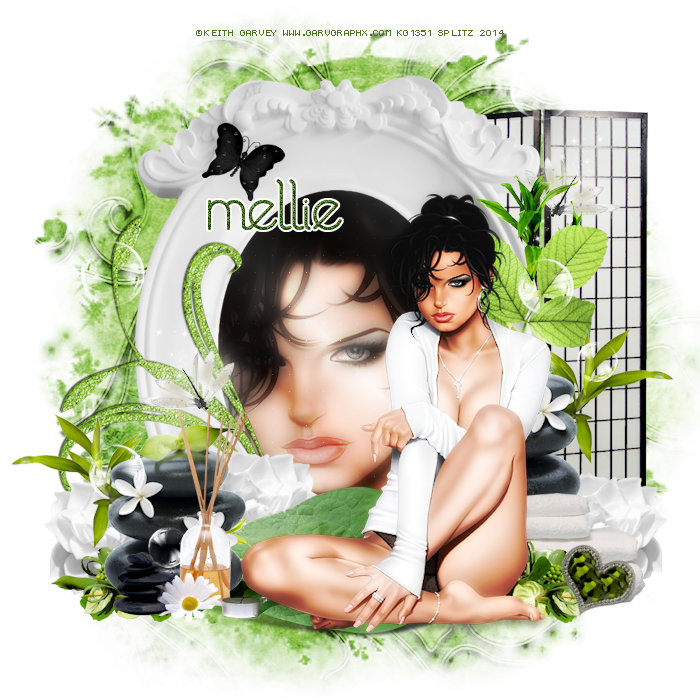
A Beautiful new kit by Mellie Beans named "The Art of Calm"
HERE
Tube
Keith Garvey
HERE
Font
FTU Zebra
HERE
Filters
Zero Radiance
Penta Color Dot
Mask
Moonbeams & Spiderwebs
HERE
Here We Go!
Open New Image 700 x 700
Resize your tube to 70 , copy & paste onto your canvas
Take Frame 1, resize to your liking
copy & paste behind your tube
Take your magic wand, click in inside your frame
Selections-Modify-Expand by 5
I took my closeup of the tube, copy & paste behind the frame
Selections-Invert-Delete-Selections None
Still on your close-up, go to layers palette, right click duplicate
On your COPY tube layer
Adjust-Blue-Gaussian Blur 6.0
Blend Mode: Hard light
on your original tube layer
Luminance - Opacity down to 46
Now take your color picker and choose 2 colors from your tube or kit to make a gradient.
Take your Magic Wand and click inside your frame.
Selections-Modify-Expand by 5
Make a new raster layer and flood fill with your gradient
**Make sure your gradient layer is behind your frame**
Go to Effects - Penta Color Dot with these Settings
234-17-255-255-255
Now lets start filling your tag!
Take Element 1, resize to your liking and place on bottom left of frame
Layers Palette-Duplicate-Flip Horizontal
place on other side of frame, behind tube
Take Element 11 resize to your liking and place underneath tube so it looks like she is sitting on it
Take Element 22 resize to your liking , Copy & paste and place in front of Element 1 left.
Take Element 24, resize Copy & paste and place behind to to the right in front of rocks
Take Element 21 Copy & paste and place behind tube and do the same for Element 4
Take Element 8, resize Copy & paste and place right in front of towels
Take Element 2 resize copy & paste and place right behind tube bottom
Take Element 2 resize copy & paste in different parts of your tag
Take Element 3 resize copy & paste in the background in the right like in my tag.
Take Element 4 resize copy & paste and place it anywhere on your tag that you would like!
Take Element 32 resize copy & paste and place to the left, in front of your frame or anywhere you would like!
Now lets make that tube POP!
Take your MAIN tube
Layers Palette- Right Click- Duplicate
Still on your COPY tube layer
Adjust - Blur - Gaussian Blue 3.0
Go back to Layers Palette
Effects - Radiance with these settings:
194-121-219-255
**REMEMBER you can always play around with the settings until you find what works for you! **
Layers Palette - Properties - Overlay
Opacity 55
Slight drop shadow!
Now once your happy with your creation Merge Visible.
Now lets blast your tag with a filter..I chose Radiance with these setting but as always you can play around with it!
So go to Effects - Radiance
109-182-149-85
Re-size to your liking
Add your Name, Copywrite and License info and save your tag as PNG!
Thank you for trying my tut! I would love to see anything you do. My email is latinangel1964@aol.com