Pages

November 8, 2015

Majestic Nature - CT PTU Tut - FWTAGS Creations


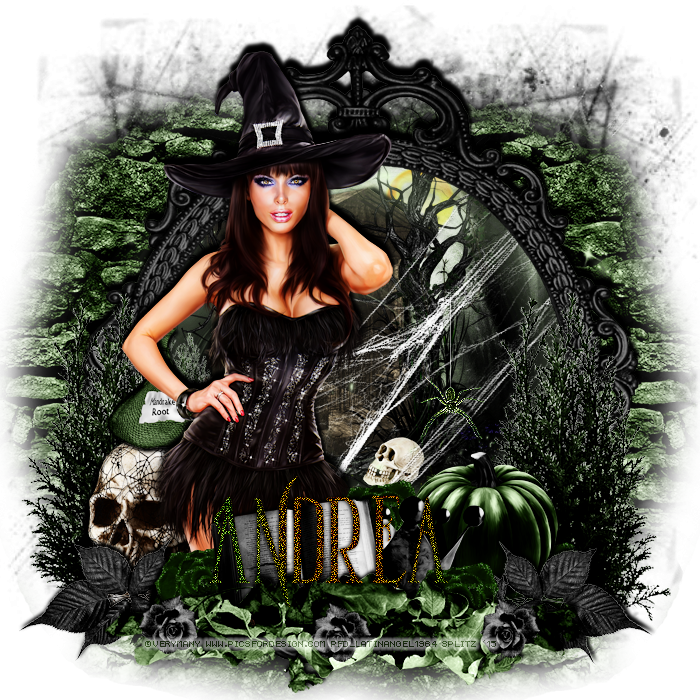
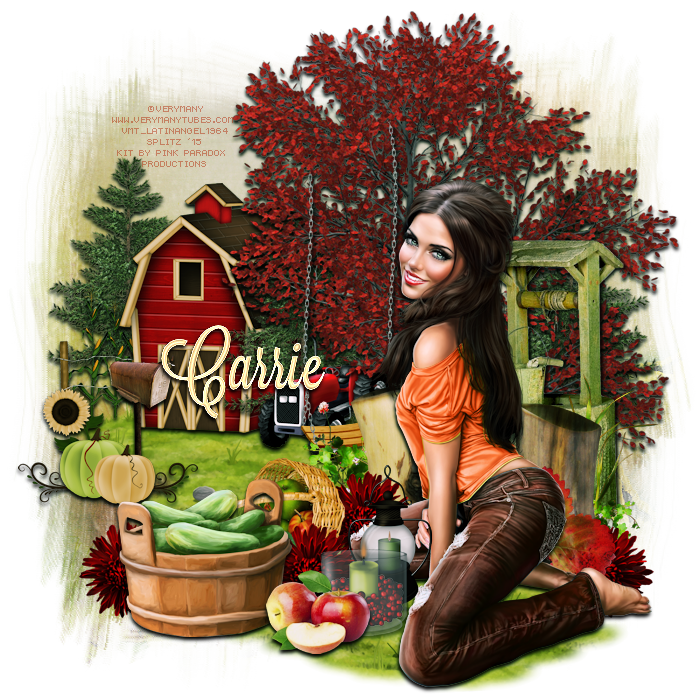
I am using PSP X6 to creat this tag but any other version will work. 

Using a fab scrap kit by FW Tags named Woodland Frolic
You can find her kits at the following stores:


Using the fantastic work of VADIS - You can find her work HERE
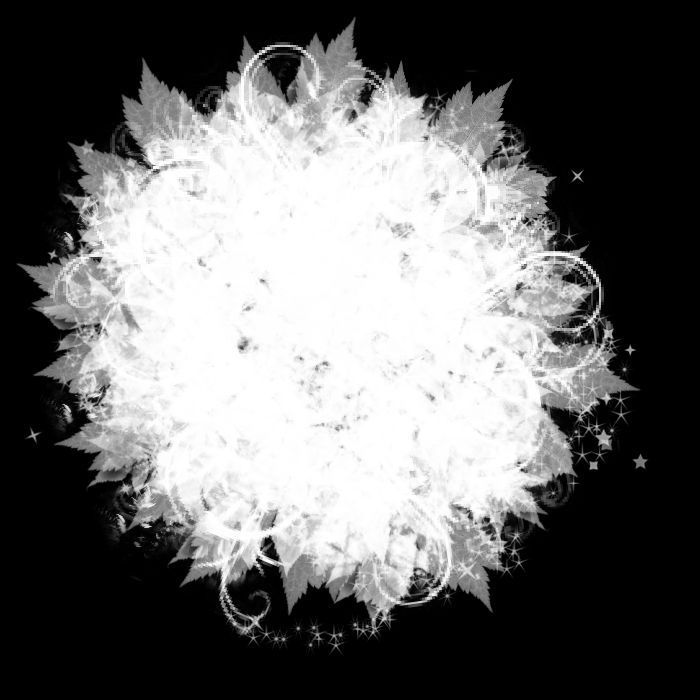
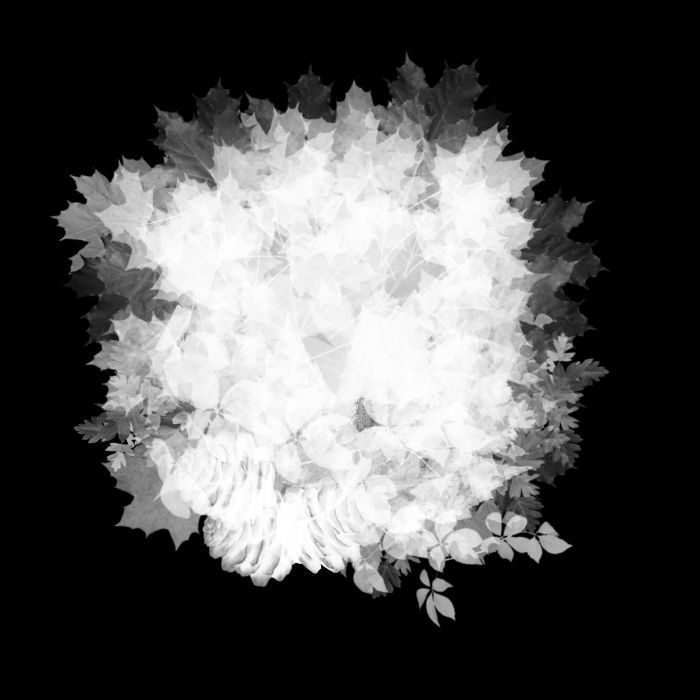
My Mask # 4

FTU Font Mussica Swash

Here we go!


Open new image 700 x 700. I resized my tube of choice by 40 c/p onto canvas. Take Frame 4 resize by 65 c/p and place behind Tube. Take Frame 2 resize by 70 c/p and place behind Frame towards left, duplicate flip horizontal and place towards right, now move your tube to the right of the first frame. El 63 Log resize by 50 c/p and place behind tube layer towards left. El 46 Squirrel resize by 20 c/p and place to bottom by tube then flip horizontal. El 59 Flower resize by 20 c/p and place to the left side by squirrel, duplicate Flower 2 more times place each layer to far left and to far right. El 19 Vine resize by 50 c/p and place to far left, duplicate flip horizontal and place to far right Add drops shadows on these layers and enhance edges. . El 50 Leaves resize by 30, c/p and place towards middle of Frame by over tube layer, then add a drop shadow then enhance edges.   El 41 Pinecone resize by 20 flip horizontal and place to the right side by Rose. El 45 Acorns resize by 25 c/p and place by Squirrel . El 64 resize by 60 c/p and place to the left side outside frame.  Working with the inside of your Frame. El 69 resize by 50 c/p and place inside frame towards left. El 65 Deer resize by 30 c/p and place inside frame in front of Tree add a drop shadow then enhance edges. . El 56 small bush resize by 30 c/p and place inside frame in front of deer Layer, duplicate and move over slightly to right. Take Paper 1 resize by 60, then take your magic wand click inside first frame expand by 6 c/p Paper. Move paper up a  little so that the green grass is showing, selections invert delete.
Add your drop shadows to all your other elements. I also added a drop shadow to the First Framethen enhance edges. Merge your tag. Add your Mask, I am using Paper 4, duplicate mask layer. Merge tag. Duplicate tag, then go to Properties - Overlay and lower opacity to 44. Add your name, Copy Write and license info and you are done!
Save as PNG!

October 31, 2015

Traveler - CT PTU Tut - Elegant Steampunk by Pink Paradox Productions


I am using PSP X6 to create this tag but any other version will work!

Fabulous kit by Pink Paradox Productions named Elegant Steampunk

Awesome work of Di_halim available HERE

Mask is by me # 7 HERE

FTU Font SteamWreck

Filters
Cybia - Screenworks
On Name

Here we go!


Open new image 700x700. I resized my tube choice by 55 c/p onto center of canvas. I am using 2 Frames 16 and 17. Frame 16 resize by 50 c/p and place behind tube, like she is sitting on the bottom edge. take Frame 17 resize by 60 and place behind Frame 16. l 43 Trunk resize by 40 c.p and place underneath tube, make sure it is behind tube layer. El 52 Gun resize by 25 c/p and place to the bottom middle of Tube. Take the following Elements 24, 25, 26, 29, 30, and 66, resize all by 20 and place them accordingly at the bottom in front of tube layer. El 134 Brown Flower and El 136 white Flower, resize by 20, take Brown flower, c/p and place to wards bottom left behind Hat, duplicate layer and move that layer towards left behind tube layer. Take El 136 White Flower and place behind second layer of Brown Rose towards left behind tube layer. Take El 134 Deco, c/p and place to far left behind White Flower. Duplicate the Brown and White Flower and also El 134 Deco and place to lower right side. El 72 Globe resize by 60 c/p and place inside Frame to the right. Add a Drop Shadow then Inner Bevel with color #ece8d9 then Enhance Edges.  El 84 Balloon, resize by 15 then free rotate right 15. C.p and place to top left and follow same Effects as we did for Globe. Duplicate El Balloon, flip horizontal and place by Tube to the right.  El 102 Clogs resize by 40 c/p and place to left side over Frame. El 105 resize by 60 and place over Frame but behind El 102. If you are happy with your tag great. Add your Drop Shadows. I added El 52 the Feather as my finishing touch. Merge your tag!  Duplucate tag, adjust gaussian blur 3.0 properties softlight and lower opacity!.
Add Your mask I did Paper 51 for mine, duplicated twice. Merge Visible again. 
Add your name, copy write and license info
save as PNG!
Thanks for looking!

October 24, 2015

City of Light - CT PTU Tut - Bon Voyage by Jackie's Jewels


I am using PSP X6 to create this tag but any other version will work!

Using Jackie's Jewels newest beautiful kit "Bon Voyage" - HERE

Fabulous art by Nocturne - HERE

Mask 117 by Wee Scot Lass HERE

FTU Font Quickier

No outside filters used!

Here we go!


Open new image 700 x 700. I resized my tube choice by 40 c/p onto canvas. El Frame 1 resize by 80 c/p and place behind tube. El 11 Airplane resize by 30 c/p and place behind Frame towards top left. El 70 Tree resize by 60 c/p and place to far left inside frame, duplicate twice place one layer in the middle and the other to far left. El 37 Eiffel Tower resize by 60 c/p and place behind middle tree layer and Airplane, I added a bevel with filter color #fffefc then enhance edges. El 12 Building resize by  40 c/p and place towards right of Eiffel Tower, also added the bevel and enhance edges effects!. El 19 Bag resize by 60 c/p and place by tube's legs. El 14 Round Luggage resize by 60 c.p and place behind tube layer to bottom left. El 60 Orange Rose resize by 30 c/p and place to the left side in front of Round Luggage duplicate, flip horizontal and place to far right. . Go back to El 60 Rose resize smaller then  flip horizontal and place to the right front of Bag layer. El 64 Shoes resize by 40 c/p and place on top of Round Luggage. El 32 Perfume resize by 30 c/p and place by Shoes. El 13 Camera resize by 40 c/p and place by Bag. El 29 Mirror resize by 40 c/p and place by Luggage to the left. El 34 Jewelry Box resize by 30 c/p and place to bottom far right.  El 50 Save the Date card resize by 30 c/p and place in front of Bag layer. El 33 Key resize by 40 c/p and place tubes hand, add a bevel and enhance edges. I erased a little bit of the chain by tube's fingers. El 86 Book resize by 40 c/p and place to the bottom. El 62 Rose resize by 40c/p and place to bottom far right behind Luggage, duplicate and place in the middle of tube behind elements duplicate again flip horizontal and place to far bottom right. Last El 39 Gound c/p and place to the bottom underneath tube and elements. If you are happy with your creation, add your drop shadows. Merge Visible. Add your mask I am using 2 Papers, #11 and #12, c/p both papers, on Paper 11 Adjust Guassian Blur 3, Properties: Hardlight and lower opacity then merge down. After you make your mask then Duplicate and merge down again. On your Merged tag layer go to Photo Effects: Film and Filters and your filter color is #a0825c. Then on your Mask layer go to Photo Effects - Time machine - Cross Processing Intensity 35. Now Merge your tag, duplicate, on copy Guassian Blur 3, then properties overlay and lower opacity to about 55. Merge one more time,  add your name, cr and license and you are done!
Save as PNG!
Thanks for Looking!

October 18, 2015

The Vampire and the Wolf - CT PTU Tut - Gothic Mystique - Pink Paradox Productions


I am using PSP X6 to create this tag but any other version will work!

Scrap Kit is Pink Paradox Productions!. A beautiful kit named Gothic Mystique. The kit has 170 Unique Elements, Beautiful 15 Frames and 40 gorgeous Papers. 
The best part is that it is now on sale at 35 % off!
Check it out HERE

Gorgeous art by Nocturne. you need a license to use her art and you can get both HERE

Mask is by me # 24

No Outside Filters used

FTU Font RM Ginger

Here We Go!


Open new image 700 x 700, I resized my tube of choice to by 35%, c/p onto canvas. El 109 Cross resize by 35 c/p and place towards right behind tube layer. El 117 resize by 60 /p and place underneath tube. El 169 Tree resize by 50 c/p and place towards left behind El Cross. El 170 Purple Tree resize by 50 c/p and place towards right behind Cross, take your eraser tool and erase as much as the trunk as needed, lower the layers down. El 17 Wolf resize by 50 c/p and place in between both trees. Now go back to Purple Tree layer, duplicate, flip horizontal and place to the left behind Wolf layer.  El 32 Chalice resize by 20 c/p and place tube's foot. El 71 Books resize by 20 c/p and place behind Chalice. ZEl 86 Key resize by 20 c/p and place by Books. El 128 moon resize by 50 c/p and place behind Tree to the top, Enhance Edges. El 58 Pirple Pumkin resize by 25 c/p and place towards bottom left behind Tube El 59 Teal Pumpkin resize by 25 c/p and place towards right side of tube. El 20 Skull resize by 15 c/p and place to far right, Add your drop shadows! Merge your Tag. Add your mask I used Paper 42 for mind, duplicate, then go to Properties: Hardlight. Merge Visible. Go to Photo Effects" Film and Filters. Filter Color: #717882 and Density 10. 
Add your name, CR and License info. Save as PNG!

Trick or Treat - CT PTU Tut - Halloween Bash by Drea's Creations


I used PSP X6 to create this tag. 

Using a frightfully fun new kit by Drea's Creations named "Halloween Bash" You can check out her blog HERE

Beautiful art by Nocturne available HERE for purchase

Mask is by me and you can just right click and save


FTU Font VTKS SABONETE

Filters
DSB Flux Bright Noise

Don't Forget Your Drop Shadows


HERE WE GO!


Open new image 700 x 700, I resized my tube choice by 40, c/p onto canvas. El 155 Frame resize by 60 c/p and place behind tube. El 116 grass resize by 70 c/p and place underneath Tube, duplicate Grass flip horizontal and just move a little bit downward. Magic Wand click inside Frame, slections Expand by 10, take El 155 black Grass resize by 60 c/p and place inside frame, move downward, selections invert delete. Paper 27 resize by 80 c/p and place inside Frame, HIT DELETE, deselect. 
Duplicate paper layer, Go to Properties, Overlay and Lower Opacity as you would like. El 124 Grave marker resize by 20 c/p and place to the far bottom fright inside frame. Repeat same steps as aboe with El 86 Ghostie. El 126 Bats resize by 50 c/p and place to the to behind Frame but over paper layer, add some bright noise and drop shadow. El 19 Candy Garland resize by 50, c/p and place to the top of Frame, add a drop shadow then enhance edges. El 91 Purple FLower resize by 20 c/p and place to bottom far left behind frame, duplicate, flip horizontal and place to far right. El 90 Black Flower resize by 20 and c/p and place behind frame just a little above Purple Flower, duplicate layer flip horizontal and place to far right as well. Elements 28 and 42 resize by 20 c/p and place to the left by tube. El 115 Skull/Grass resize by 60 c/p and again place by bottom far right in front of Purple Flower Layer, duplicate flip horizontal and to bottom far left. El 104 Blck Pumpkin resize by 20 c/p and place to far right behind tube layer. El 114 Tree resize by 60 c/p and place to the left side of Frame. El 50 Decor resize by 60, free rotate 25 Left c.p and place behind Tree go back to El 50 resize smaller, free rotate 25 Right c/p and place to the bottom far right. . El 41 and 112 Lanterns, resize by 20 c/p and place over tree Layer as you wish, Enhance Edges then drop shadows.  I went back to my Flower Elements 90 and 91 resized them smaller by 30 and c/p and place towards bottom and just sprinkle some of the layers of the flowers around. I added El 141 Bubbles towards background. Finish adding your drop shadows!. Merge your tag!. For the Mask I used Paper 17> I duplicated the mask 3 times, merge down, duplicate again flip horizontal. On your Merge tag go to Effects: Phot Effects: Film and Filters. My filter color is #8a5e51 density 10. 
Add your name, CR and License info!

Save as PNG!
Thanks for looking!

October 9, 2015

A Bootiful Night - CT PTU Tut - Mysterious Magic - Pink Paradox Productions


I am using PSP X6 to create this tag but any other version will work.

Beautiful kit by Pink Paradox productions named Mysterious Magic  - This kit is now on sale at her store! It has 180 unique elements, 15 papers and 45 gorgeous papers!

Beautiful tube by Alex Prihodko available HERE

Mask is by Me #27 HERE

FTU Font Tron


Filters 
XERO - Radiance

HERE WE GO!


Open new image 700 x 700. I resized my tube by 45 c/p onto canvas. El 115 and 113 resize by 60 c/p and place behind your tube. El 114 resize by 80 c/p flip horizontal and place behind El 115. El 99 resize by 40 and place to the left on top of El 114. El 136 Purple Flower, resize by 60 c/p onto cnavas, take your eraser tool and erase as much as you can from stem at the bottom, now move that layer to the left in front of El 114. El 135 Black Flower resize by 30 c/p and place to the far left in front of Purple Flower Layer. Take Frame 5 resize by 50 c/p and place to right behind all elements. Take magic wand, slect inside frame and expand by 10, c/p Paper 14, invert then delete. Take close up of tube c/p inside frame, HIT DELETE now deselect. On close up tube layer, duplicate,  on copy layer Gaussian Blur then Properties: Screen, on original layer Properties Screen. , Properties El 46 Silver Pumpkin resize by 25 c/p and place by tube to the right. El 48 Witchy Bag resize by 15 c/p the Free Rotate 15 Right and place by Silver Pumpkin. El 30 Bottles resize by 15 c/p and place to the right of Silver Pumpkin. El 66 Book resize by 20 c/p and place to the left by tube. El 80 Bat Deco resize by 20 c/p and place by Book. El 69 Ouija Board resize by 30 c/p and place right behind tube. El 73 Key resize by 30 c/p and place on Book. El 144 Leave resize by 40 c/p and place to far right behind El 114, duplicate flip horizontal and place behind Frame to the right. El 131 and 133 Flowers resize by 10 and scatter some layers at the bottom. El 131 Blue Flower resize by 30 flip horizontal and place to bottm far right behind El 114. El 172 Chain resize by 30 enhance Edges c.p and place over close up tube, erase anything that is showing outside Frame. El 116 Moon resize by 50 c/p and place towards top, enhance edges. . El 100 Bats resize by 40 c/p and place towards top  as well. Add your drop shadows. On Tube Layer, duplicate gaussian blur 3, on copy properties screen, lower opacity to 79. Make your mask I used Paper 43 for mine, then duplicate mask, flip horizontal. <erge visible. Duplicate tag, on copy use Xero Radiance with these settings:

164, 88, 128 and 106.

Merge Visible. Add you name, CR and license info. Save as PNG.
Thanks for looking!

October 2, 2015

Magical Night - CT PTU Tut - Pumpkin Magic - Pink Paradox productions


I am using PSP X6 to create this tag.

Scrapkit is called Pumpkin Magic and magical it is!. The elements, papers and frames are just beautiful! A must have for your collection!
Available HERE

This darling tube is Kajenna and you can get it HERE

Mask is by Millie # 110 HERE

FTU Font Wizards Magic

Xero Seasons

Here We Go!

Open new image 700 x 700, i resized my tube choice by 25 c/p onto canvas
Frame 16 resize by 60 c/p and place onto canvas, magic wand click inside frame expand by 6 c/p and place Paper 17 resize by 60 c/p and place behind Frame. Selections, invert, delete, deselect. On Paper and Tube Layer, add Xero Seasons with these settings going down:
12, -34, -9 and 179. Now on Paper layer, Enhance Edges, Duplicate on copy go to Properties then Overlay. Behind Frame, take El 65 resize by 60, c/p and place behind Frame towards left, duplicate move that later towards far right, duplicate again and place towards top showing over frame. El 19 resize by 40 c/p and place to the bottom  behind tube layer. El 58 resize by 30 /p and place by left side by tube. El 57 and El 74 resize by 25 c/p and place to the right side by tube. El 44 resize by 25 c/p and place behind El 169. El 116 resize by 25 c/p and place to far right, duplucate and move layer to far left. El 131 resize by 25 c/p and place towards far left in front of  El 116, duplicate layer and move to right, duplicate one more time and place behind El 19. El 98 resize by 25 c/p and place to the top of Frame, then enhance edges. El 50 resize by 20 c/p and place to the left side of Frame. El 161 resize by 30 c/p andplace to bottom left side in front of Frame, duplicate flip horizontal and place to the right side of Frame. duplicate 2 more times and scatter as you wish towards bottom. If you love your tag great!. I added some sparkles towards the back over paper layer and of course El 17 the Ghost resized by 50. Add your drop shadows and Merge Visible. I just added Photo Effects: Time Machine - Cross Processing intensity 14.  Add your mask, I used Paper 15 for mine. 
Add your name, Copy Write and licnese info. Save as PNG. And you are done!
Thanks for looking!

Witches Brew - CT PTU Tut - Pink Paradox Productions


I am using PSP X6 to create this tag

Scrapkit is called Witching hour by Pink Paradox Productions! This Halloween fun kit has 160 Elements 15 gorgeous Frames and 20 Papers. Everything needed to create those scary tags! It is now on sale
at her store!

I am using the gorgeous work of Amberly Berendson available HERE

I am using 2 Masks. 
Wee Scott Lass #117 HERE
Moonbeams and Spiderwebs # 50 HERE

FTU Font Nightmare

No outside filters used

HERE WE GO!


Open new image 700 by 700, c/p tube of choice onto canvas. El 39 Jack-o-Lantern resize by 35 c/p and place right underneath tube. . El 64 Books resize by 25 c/p and place towards left by tube. el 56 Mummy Powder resize by 20 c/p and place by books.El 54 Jar resize by 20 c/p and place by El 56. El 121 Orange Flower resize by 15 c/p and place between Books and Powder. El 122 Yellow flower follow sames steps as with El 121 Orange Flower c/p and place to the right side of Powder. El 52 Bottle resize by 20 c/p and to the right behind Powder. El 95 Cauldron resize by 50 c/p and place to far left behind tube layer then Enhance Edges. . El 27 Bat resize by 50 c/p and place to middle  left behind tube Enhance Edges. . El 11 Ghost resize by 30 c/p and place towards right behind tube layer. El 129 Shroom resize by 40 c/p and place to the right a little above behind Jack o Lantern, duplicate and bring that layer down to the bottom right in behind Ghost. Duplicate again, flip horizontal and place to the left behind Cauldron. El 149 Barren Tree resize by 60 fip horizontal c/p and place the back slightly towards left. El 158 Decor resize by 40 c/p and sort of drape it to the top of Tree, enhance edges. El 163 Clouds resize by 50 c/p and place to the middle behind Tree Layer. El 101 House resize by 50 c/p and place towards back behind Tree Layer but in front of Cloud Layer. Add your drop shadows. Merge Visible. I am using 2 Masks. First one is by MoonBeams and SPiderswebs #50 using Paper 128, then I duplicated Maks Merge DOWN. Second mask layer  I made with Wee Scott Lass mask # 117 and Paper # 60. 
Merge Visible, duplicate then Guassian Blur on copy 6.0. Properties Overlay the lower opacity to 40.
For the name I used Paper 27, Add a drop shadow, enhance edges then I duplicate name layer. On copy I added  DSB Flux - Bright Noise, then back to Properties Screen. Merge Down name layers. Selections All, Modify Expand by 2 then new layer. I chose the green from the tubes outfit, and flood fill. Add a bevel, Bright noise. Merge Down and u r done!
Add Copy Write and License info and you are done!
Thanks for looking!

September 27, 2015

Forever Autumn - CT PTU Tut - Autumn Breeze - Pink Paradox Productions


I am using PSP X5 to create this tag but any other version will work!

Stunning kit by Pink Paradox Productions named "Autumn Breeze". Available HERE

Beautiful tube by VADIS  available HERE

Mask is by DEE HERE. I used the 2nd one from top.

FTU Font Mussica Swash

No Outside Filters Used

HERE WE GO!


Open new image 700 x 700. I resized my tube of choice by 35%, c/p onto canvas. Frame 12 resize by 60 c/p onto canvas behind tube go to Xero Radiance with these settings:
213, 91, 200, 255 hit OK, then give it one more dose of Xero Radiance! Paper 1 resize by 60, magic wand click inside frame expand by 9, c/p paper, selections,  invert,  delete,  deselect. El 107 Grass resize by 60 c/p and place underneath tube and frame. El 134 Leaf and El 12 Roses resize both by 40 c/p and place to the bottom right behind tube. El 85 Lantern resize by 30 c/p and place by Rose. El 155 Pinecone resize by 20 c/p and place behind Lantern. El 75 Open Book resize by 30 c/p and place to the right over Blanket. El 3 Bird resize by 20 c/p and place on Open Book. El 16 Grapes resize by 10 c/p and place by Bird's beak. El 121 Brown Rose resize by 10 c/p and place behind Open Book. El 34 Glass Pumpkins resize by 30 c/p and place to the left side of Frame behind Tube layer. Duplicate El 121 Brown Rose, flip horizontal and place above left behind Glass Pumpkins.l 124 Branch resize by 30, c/p and place to the far left behind Brown Rose, Duplicate this layer then merge down, duplicate again flip horizontal and place to the right. El  133 Brown Leaf resize by 20 c/p and place to the left. El 122 Brown Roses resize by 20 c/p and place by Brown Leaf, Duplicate flip horizontal and place to the right by book. Working now with behind the Frame. El 158 Tree, resize by 50. C/p and place to the left side behind Frame, duplicate merge down. Duplicate again flip horizontal and place to the right. Duplicate one more time and bring the layer a little above behind Frame. Last El 153 Leaves Scatter, resize by 50 c/p and place to the background behind tube then Enhance Edges. Add your Drop Shadows and merge your tag. Go to Photo Effects - Cross Processing - Intensity 16. Add your mask, I am using Paper 27 for mine!
Add your name, CR and License info
Save as PNG!

By the Moonlight - CT PTU Tut - A Chilling Night - Jackie's Jewels


I am using PSP X6 to create this tag but any other version will work!

Beautiful scrapkit by Jackie's Jewels named "A Chilling Night". Visit her HERE

Adorable tube by Kajenna HERE

Mask #60 is by Wee Scott Lass HERE

FTU Font Frankendork Tall

No outside filters used

Here we go!


Open new image 700x700 you can crop when done. I resize my tube choice by 25% c/p onto canvas. EL Ground c/p and place underneath tube. El Bird 3 c/p and place to top left of tube. El House 2 resize by 70 c/p and place to the left side of tube towards middle.  Back to El Ground, Duplicate layer, flip horizontal and place that layer underneath El House 1. Moon 2 resize by 70 c/p and place towards top right behind House 2. El Dead Bush 1 c/p and place to the left side of tube. El Ouija Board resize by 70 c/p and place to the right side of tube. El Basket of Pumpkins c/p and place to the left side of tube. El Dead bush 2 resize by 50 c/p and place to right side by Ouija. Leaf 1 c/p and place by Basket of Pumpkins. El Stump resize by 70 c/p and place to far left behind all elements. El Leaf 3 c/p and place to left behind Tree Stum, duplicate flip horizontal and place in front of Tree Stump for the right. Moon 2 resize by 150 c/p and place to the background behind House 2. El House 1, c/p and place directly behind House 2. El Lantern resize by 50 c/p an dplace left side of tube. El Pumpkin 2 resize by 50 c/p and place to the right side of tube. 
Add your drop shadows then merge visible. Duplicate tag, adjust gaussian blur 6.0 then go to properties overlay lower opacity to about 50. Merge visible again. Add our mask, I used paper 3, and colorized it, go to 
Adjust - Hue Saturation - Colorize: Hue: 44 Saturation 92
Merge Visible, add your name, cr and license info
Add your name, cr and license and save as PNG!


September 20, 2015

Sexy Lady - CT PTU Tut - Mysterious Seduction by Pink Paradox Productions


I am using PSP X6 but any other version will work!

Stunning kit by Pink Paradox Productions named "Mysterious Seduction. Available HERE

I am using the awesome art of Barbara Jensen HERE

Mask is #109 by Millie HERE

FTU Font Respective 2.0

No outside Filters used

HERE WE GO!


Open new image 700 by 700. I resized my tube choice to 80, c/p onto canvas. On tube layer Duplicate, on copy enhance edges and lower opacity to 55 then properties overlay. Add a drop shadow on Original tube layer! El 106 Rug resize by 60 c/p and place underneath tube. EL 126 Red Rose resize by 30 c/p and place to the left a little above behind Rug layer, duplicate flip horizontal and place to far right. El 137 Black Rose resize by 30 c/p and place to the far left, duplicate flip horizontal and place to the right slightly above Red Rose. El 7 Butterfly, c/p and place behind tube, enhance edges. . El  121 Bow resize by 50 c/p and place to bottom far right, duplicate layer 3 more times and just frame around butterfly (see tag for reference). El 72 Charm Bracelet resize by 50 c/p and place behind tube but in front of Butterfly layer then Adjust - Sharpen. El 67 resize by 25, free rotate 25 left, c/p and place towards  to the left. El 19 Crown resize by 30 free rotate 25 right c/p and place towards bottom left in front of tube. El 47 Bottle resize by 30 c/p and place by Crown. El 57 Jewelry Box resize by 15 c/p and place by bottle. EL 25 Dice resize by 30 c/p and place by Crown towards right. El 116 Rose resize by 10 /p and place in between Dice, duplicate later and place to far left behind Bottle. Go Back to El 129 Red Rose duplicate flip horizont al place towards top right behind butterfly. El 143 Red Leaves resize by 30 c/p and place towards bottom right behind Butterfly but slightly above Red Rose, duplicate layer flip horizontal and place towards left behind butterfly. Add your drop shadows. Merge Visible. Add your Mask I used Paper 5. I added some Sparkles. Merge Visible. Go to Photo Effects - Time Machine lower Intensity to about 27.

Add your Name, CR and License andsave as PNG\Thanks for looking!

Season of the Witch - CT PTU Tut - Spider Queen by Drea's Creations


I am using PSP X6 but any other version will work!

I am using an Exclusive kit "Spider Queen". This beautiful and fun kit is available EXCLUSIVELY at the Xerac Store . You can get it HERE

Awesome tube by VM available HERE

Mask is #112 by Trese HERE

FTU Font Parseltongue

Filters
DSB Flux Bright Noise for Name
Aged Newspaper

Here we go!


Open image 700 x 700, resize tube to 50 c/p onto canvas. EL 77 Frame resize by 80 c/p and place behind tube. Close off tube layer for now! El 55 Background resize by 80 c/p and place towards left side behind frame, duplicate, flip horizontal and lace towards right side behind frame. Magic Wand click inside frame, selections, modify, expand by 6, Take Paper 3 resize by 60  c/p and place behind Frame, selections, invert, delete, selections none.  El 39 Tree resize by 60 c/p and place towards middle right inside Frame. El 42 Grass resize by 60 c/p and place towards bottom of tree. El 56 Cobblestone ground resize by 60 c/p and place underneath Tree and Grass, erase anything showing outside your Frame. El 38 Mausoleum resize by 40 flip horizontal and place behind your Tree, then go to Effects: Artistic - Aged Newspaper - Aged amount 25. Go Back to Tree layer duplicate flip horizontal and place to the far left.  El 40 Bush resize by 20 c/p and place to far left behind Tree layer. El 58 Yellow Moon resize by 20 c/p and place to the right behind Mausoleum. El 71 Misty Swirl resize by 70 c/p inside your Frame. Open up your tube layer now move your tube slightly more to the left. El 80 Leaves resize by 80 c/p and place to the bottom of your tube. EL 18 Skull resize by 30, flip horizontal and place towards bottom left behind tube. El 2 resize by 30 c/p and place by bottom of tube. El 50 Green Rose resize by 15 c/p and place to the left by book. El 6 Mandrake Root resize by 25 c/p and place on top of Skull. El 23 Crown and EL 52 Pumpkin resize by 25 c/p  to the bottom right. Go back to El 50, duplicate 3 times and scattter at the bottom. El 51 Black Rose resize by 10 c/p and place towards bottom left in front of Leaves, duplicate twice and  scatter to two layers across, El 49 Black Leaves resize by 30, cp and place to far right, duplicate layer and place to far left. zEl 69 Web, Enhance Edges, free roate Left 25. c/p and place inside frame and erase any part of the web showing outside frame. Duplicate Web then Merge Down. El 66 Spider, enhances Edges c/p and place over Web, then take your eraser tool and erase as much of the line as you can. Last go back to El 40 Bush, this time resize tby 50 c/p and place one to far left in front of Frame, duplicate and place to far right. Add your drop shadows. Merge your tag!. Duplicate tag, go to Properties: Soft Light and lower Opacity as you like I did mine to 69. Add your License, CR and Name
Merge Visible, save as PNG!

Thanks for looking!

September 16, 2015

Heartland - CT PTU TUT - Caramel Apples by Pink Paradox Productions


I am using PSP X6 but any other version will work!

Scrapkit is a lovely one by Pink Paradox Productions named "Caramel Apples" available HERE for purchase.

Using the lovely work of VeryMany HERE

Mask by WSL HERE

FTU Font Lavanderia Sturdy

Filters
XERO Radiance
Photo Effects


Here We Go

Open new image 700 x 700. I resized tube by 45 c/p onto canvas. El 158 Tree Stumps resize by 40 c/p to right side behind tube add Efects: Xero Radiance with theses settings: 82, 50, 128, 209. . El 170 Red Tree resize by 60 c/p and place behind El 158. El 42 Fallen Apples resize by 20 flip horizontal and place towards left behind tube. El 119 Grass resize by 40 c/p and place underneath tube, duplicate and move that layer up. El 114 Barn resize by 25 c/p and place towards top left of E 114. El 44, 103, 113, and 165 resize by 15 c/p and place by El 114 Barn. El 84 resize by 20 c/p and place tube. El 83 resize by 30 c/p and place behind El 158. El 38 Apples resize by 15 c/p and place in front of El 84. El 149 Leaves resize by 20 c/p and placebehind tube towards bottom right. El 126 Flower resize by 20 c/p and place by bottom far right, duplicate twice and scatter as you wish at the bottom or like in my tag. El 98 Swign resize by 40 c/p and place over left side over tree. Last El 148 Fir Tree resize by 25 c/p and place left side behind Barn, duplicate twice, place on elayer to the right side of El 170 Red Tree and the other by Tracter. El 50 Pickles resize by 25 c/p and place to the bottom by tube. Last el 45 resize by 15 c/p and place by El 38 Apples. Add your drop shadows. Add your Mask, I used Paper 9 for mine! Merge Visible. Go to Effects: Photo Effects: Cross Process and lower intensity to 20.

Add your name, CR and license and you are done!


September 12, 2015

Colors of Autumn - CT PTU TUT - Whoo Loves Fall by Pink Paradox Productions


I am using PSP X6 but any other versionwill work.

Beautiful kit by Pink Paradox Produtions named Whoo loves Fall available HERE for Purchase!
40% Sale going on now so get in there and buy some goodies!

Lovely art by Alex Prihodko. You need a license to use his work and you can get both HERE

Mask is by Dee HERE. I used the first one.

FTU Font Acryle Script Personal Use

Filters
Xero Radiance

Here we go!


Open up new image 700 x 700. I resized my tube by 40, c/p onto canvas. Frame 11 resize by 60 c/p and place behind tube. Take Frame  2  follow above steps c/p and place Frame 11. Take Paper 46 resize by 60, take magic wand click inside Frame expand by 6 c/p paper onto frame, selections, invert, delete. El 117 Berries resize by 60 c/p and place to the top middle of Frame. El 88 Bench resize by 20 c/p and place inside of frame towards left. El 2 Squirrel resize by 10 and place on top of Bench. El 99 Tree resize by 20 c/p an dplace towards right of Bench. El 49 Basket resize by 10 and place towards bottom left of Bench. El 25 Apple resize by 5 c/p and place by Basket, duplicate flip horizontal and place away from Basket.  El 93 House resize by 20 c/p and place about midway behind bench. Wl  15 Owl resize by 30 c/p and place towards top left underneath Berries. El Lantern resize by 60 c/p and place towards bottom left behind tube. El 27 Pumpkin resize by 30 c/p and place next to Lantern. Elements 33, 46 and 65 resize by 15 c/p and place at the bottom. El 102 Rose resize by 15 c/p and place between Book and Cupcake, duplicate Rose layer and place to far left. El 104 Sunflower resize by 30 c/p and place towards far left. Duplicate Sunflower flip horizontal and place towards far right El 129 Leaf, c/p and place tot he bottom underneath elements to the left, duplicate flip horizontal and place to the right, erase as much as the branch as you can. El 120 resize by 20 rotate left c/p and place on your frame, you just want to cover whatever gaps you may have, I needed just to layers. I added elements 22 and 23 Butterflies resized by 20 c/p and place as you would lie. Add your drop shadows!
Merge visible. Add your mask, i used Paper 7 for mine. Merge visible again.
Go to Effects - Xero bad Dream with these settings:
128, 70, NONE
Add your Name, License and Copy write info and you are done.Save as PNG
Thanks for looking!

September 2, 2015

Belladonna - CT PTU Tut - Steam Mystique by Pink Paradox Productions


I am using PSP X6 to create this tag! but any other version will work!

Using a stunning new kit by Pink Paradox Productions named "Steam Mystique" 
Scrapkit is on Sale now so hop on over to her store HERE to pick up some goodies!

The tube is an Anna Liwanag  EXCLUSIVE and you can get this beauty at our Pimpin PSPer's forum. PP is the best forum around. We have Amazing Challenges, Games and gorgeous Exclusives from Garv to Kiwi Firestorm.
So check us out

Mask is #84 By Wee Scot Lass HERE

Texture 7 by Vix HERE

FTU Font Carlotta

Filters
XERO Radiance

Here We go!

Open new image 700 x 700. I resized my tube by 40 c/p onto canvas. ZFrame 16 resize by 60, c/p place behind tube. Working with your Frame, magic wand, click inside left side of Frame selections, expand by 6. c/p closeup of tube, selections invert delete, deselect. Duplicate closeup of tube and move to the other side of frame. Go back to left side of Frame, duplicate the close up tube layer, Adjust: Gauissian Blur 6, properties screen then on original tube closeup layer properties overlay lower opacity to 55. Repeat these steps  close up tube layers on right side of Frame. 
Go back to Frames, magic Wand, click inside both sides of Frame, expand by 6. Take your texture, I am using #7 from Vix, 
Adjust: Hue - Saturation: Colorize
Hue: 4    Saturation: 100
Click ok and c/p Texture behind Frame, Selections, Invert Delete, Deselect.
El 124 Clogs  resize by 40 c/p to the left side behind Frame, duplicate and place to the top by Frame. Duplicate again flip horizontal and place to the right top behind frame, duplicate and place to the right side of Frame. El 155 Red Rose resize by 30 c/p and place to the lower right behind tube, duplicate flip horizontal and place to the top middle between El Clogs. El 129 Deco resize by 40 and place to the top right of Frame, just behind tube. El 83 card resize by 40 free rotate right 15 c/p and place to the top right behind frame. El 81 Card resize by 40 free rotate left 15 c/p and place behind tube to the left. El 55 Books resize by 25 c/p and place by tube to the right. El 73 Candles  resize by 25 c/p place on top of books. Rl 60 Compass resize by 20 c/p and place behind Books. El 151 Red Rose resize by 10 c/p and place by Candles, duplicate layer flip horizontal and place  to the left by Books. El 152 resize by 10 c/p andplace between books and compass. El 27 Fan resize by 30 free rotate left 15 c/p and place behind tube to the left. El 6 Skull resize by 20 c/p and place by Books. El 5 Eye Mask resize by 20 c/p and place by Skull. El 42 Bottle resize by 20 c/p and place by Red Rose. El 30 Bag resize by 25 c/p and place behind tube to the left. El 181 SParkles resize by 50 c/p and place over top of Frame. Add your drop shadows!. Merge your tag. Add your mask i used Paper 35 place mask to the left (remember to deselect), duplicate mask and flip horizontal. Merge Visible.
Add Xero Radiance with these settings
128, 50, 128, 255
Add your name CR and License.
Save as PNG
Thanks for looking!

August 30, 2015

Sunflowers - FTU Tut - Golden Days of Autumn by Gold Dust


I am using PSP X6 to creat this tag

I found this really pretty FTU kit by Gold Dust
 Do not forget to leave some love if you download!

Using the fabulous work of Vika. You can get her work HERE

Mask is #32 by me HERE

FTU Font Sverige

No outside filters used

Here we go!

Open new image 700 x 700. I resized my tube by 25 c/p onto canvas. Frame 7 resize by 85 c/p place behind tube. Paper 9 resize to 60, magic wand click inside frame expand by 6, c/p paper, selections invert delete. El Pine cones 2 resize by 60. I used this element to frame around the Frame, so c/p and place to the top left behind Frame, duplicate as many times as you need to frame around it. I have 7 Layers. El Wheel barow resize by 60 c/p and place towards bottom left inside Frame. El Squash resize by 40 c/p and place over Wheel barrow about halfway. Take eraser tool and magnify your tag by about 200 or 250 and erase as much as of the Squash to make it look like its in the Wheelbarrow.  El Apples 2 resize by 30 c/p and place to the left by tube. El Acorns 2 c/p and place to the left by Apples 2. El Lantern resize by 30 c/p and place to the far left behind Acorns 2. El Flower Spray resize by 70, c/p and place to the far left behind Frame and Paper, duplicate flip horizontal and place to the right, Duplicate again rotate right and place to the top left, but leave this layer showing over the Paper layer, duplicate flip horizontal and place to the top right. El FLower 7 resize by 40 c/p and place to the bottom middle behind Acorns, duplicate twice and scatter to each side side. El Book resize by 40 c/p and place to the right side by tube. Acorns 1 resize by 25 c/p and place by Book. El Pocket Watch resize by 40 c/p and place by Acorns 2. Flower 8 resize by 20 c/p and place layer behind Book, duplicate twice and scatter the two layers anywhere around the bottom. Bow 7 resize by 60 free rotate left 15 c.p place to the top left. Last Bird resize by 40 c/p and place on top of Bow.
If you want to add the Closeup tube to the background, just selected your frame expand by 6, c/p your closeup of the tube, selections invert delete. Duplicate tube layer, adjust guassian blur 6 properties screen.  Add your drop shadows then Merge your tag then crop. Got to Time Machine - Cross Processing Intensity 14
Add your name cr, and license and you are done

Thanks for looking!


Masks 32 to 34

Right Click and Save!
Mask 32

Mask 33


Mask 34


post signature

August 28, 2015

A Day In September - FTU Tut - Rustic Fall - Whisper in the Wind


Using PSP X6 to create this tag but any other version will work. 

I am using a beautiful kit by Whisper in the Wind. This is her part in the August 2015 Digi Express Blog Train "Rustic Fall"

Using the lovely work of Alex Prihodko

Mask is by Dee # 3
FTU Font
Mavblis Demo
Filters
Xero Radiance
Xero Bad Dream
Textures is from Deviant Art
Used #3
HERE
Here We Go!
Open new image 700 x 700, c/p tube of choice onto canvas. Frame 1 resize by 60 free rotate right 25 c/p place low towards right, duplicate layer, flip horizontal and place up towards the left. Hide your tube layer for now we are working with the frames. Magic Wand click inside top Frame expand by 6 c/p texture of choice selections invert delete, deselect. Do same for second frame. 
Magic Wand again click inside top frame, expand by 6, c/p closeup of tube layer, selections invert delete. Do the same for second Frame. Back to first frame
, duplicate tube closeup layer, on copy Adjust-Gaussian Blur 6. Go to Effects - XERO Radiance with these settings:
143, 209, 252, 255
then go to Properties: Screen, Still working with the copy, go to Xero - Soft Vignette with the following settings:
Horizontal, Sharp, Background Color, Diagonal Mesh
13, -38, 0, 255
Follow same steps for other Frame. Now working on decorating your out frame. El 38 Leaves resize by 50, c/p and place to the top behind Left Frame. Duplicate, flip horizontal and place towards right side middle, Duplicate that layer, flip vertical and place to the bottom right behind frame. Duplicate that layer flip horizontal and place towards middle left behind frame. El 34 Nuts resize to 40 c/p and place to middle right, duplicate flip vertical and place to the middle left. El 48 Pine cones resize by 30 c/p and place to the top right by El 34. I duplicated the Pine cones 3 more times and just scattered them around. El 50 Branches, resize by 50 c/p and place to the bottom right, again I duplicated layer 3 more times and spread it around behind my Frames. El 15 Purple Flower resize by 20 c/p and place towards top left behind your Leaves layers, again I duplicated the flower layer 8 times and just scattered them around behind my leaves layer. Open up your tube layer. El 1 Lantern resize by 30 c/p and place behind tube to the left. El 55 resize by 50 c/p and place to the bottom of tube. El 45 Mirror resize by 25 c/p and place in front of El 55 to the bottom. El 57 Fruits resize by 25 c/p and place next to Mirror. El 15 Red Rose resize by 15 c/p and place to far right behind Lantern, duplicate layer twice and scatter at the bottom as you like. El 30 Leaves resize by 50 c/p and place to far left behind El, duplicate flip horizontal and place to the far right. El 22 Shrooms resize by 25 c/p and place to far left behind Lantern. Erase any part of the tube showing at the bottom. 
Add your drop shadows.
On tube layer, duplicate, go to Adjust Guassian Blur 3.0 then go Effects - Xero - Bad Dream with these settings:
82, 176 Colourization NONE
then go to properties : Screen and lower Opacity to about 48
MERGE VISIBLE. 
Photo Effects: Time Machine - Cross Process and lower intensity as you like. 
I added the Sparkles element as well.
Add your Mask I used Paper 1 for mine.
Merge Visible again\Add your Name, CR and license info
Save as PNG!
Thanks for looking
post signature

Summer's End - CT PTU TUT - Autumn in Paris - Pink Paradox Productions


I am using PSP X6 but any other version will work

Using a stunning kit by Pink Paradox Productions named "Autumn In Paris"

Beautiful art by Alex Prihodko. You need a license to use his work and you can get 

Mask is #30 by me

FTU Font MF Kind and Witty

No Outside Filters Used

HERE WE GO!
Open new image 700 x 700, I resized my tube by 35 c/p onto canvas Fram 20 resize by 50 c/p and place behind tube. Frame Frame 27 resize by 58 c/p and place behind Frame 20 Duplicatelayer and place in front of Frame 20. Magic Wand click inside Expand by 10. Paper 26 resize to 60 c/p onto frame selections invert delete move paper layer towards back of Frame 20. El 167 Tree resize by 50 c/p and place to left side behind Frame, duplicate  place towards right side behind Frame. Go back to El 167 Rotate Right, c/p and place towards bottom left behind Frame, Duplicate again flip horizontal and to the right., duplicate again and place to the top. The idea is to surround the whole frame, you can see my tag for reference. Take your eraser tool and erase the tree trunk for each layer. After you are done you can merge down the tree layers. El 172 Bow resize by 50 c/p and place to the top left of Frame. El 90 Lantern resize by 20 c/p and place to the left, duplicate Lantern and place slight downward.  El 115 Rose and El 163 Mushroom resize by 30 c/p and place to the bottom left behind tube. El 63 Camera resize by 25 c/p and place to the bottom far right. l 67 Book resize by 20 c/p and place behind Camera. El 75 Heart resize by 20 c/p and place by Camera. El 116 Brown Rose resize by 20 c/p and place to the bottom middle, duplicate and place layer to far right behind Book. El 122 Blue Flowers resize by 10 c/p and place to the middle by Brown Rose, duplicate twice and scatter  to the left and right. . El 109 Walnuts resize by 20 c/p and place to bottom middle. El 140 Leaf resize by 30 c/p and place to wards bottom underneath all Elements, duplicate layer 3 more times and spread them all at the bottom. El 8 Squirrel resize by 25 c/p and place on Mushroom. El 4 Butterfly resize by 25 c/p and place towards right side of Frame. Last El 107 resize by 70 c/p and place underneath all elements at the bottom.  If you are happy with your tag great. I added some sparkles!. Add your drop shadows. Merge your tag, duplicate, Properties Overlay lower opacity to 36. For my Mask layer I used Paper 28, I duplicated my mask twice. Merge visible. Add your name, CR and License info
Save as PNG
thanks for looking!
post signature

August 21, 2015

September - CT PTU Tut - Bonfire Nights by Jackie's Jewels


I am using PSP X6 to create this tag but any other version will work!

Stunning kit by Jackie's Jewels named "Bonfire Nights"

Gorgeous work by Di Halim

Mask is by Me #27

FTU Font Anha Queens VMF

No Outside Filters Used!

Here we go!

Open new image 700 x 700. Make your Mask, I used Paper 4 for mine, duplicate maks layer Merge Down. Resize tube to 35 c/p onto canvas
El 82 resize by 55 flip horizontal c/p and place underneath tube. 
El 41 House resize to 80 c/p place to the right for now, you will move it as you add on elements. El 35 resize by 80 place to the right on front of House layer 
El 86 Grass c/p and place to the bottom in front of Tree. El 8 Flowers resize by 40 c/p and place towards bottom in front of Grass layer. El 34 Log resize by 80 c/p and place to the bottom in front of Flowers. El 35 Leaf Scatter resize by 80 c/p and place just underneath Log, duplicate this layer and move towards left. El 15 Car resize by 35 c/p and place towards left side of House. You can move your house as you see fit. you want to make it look like its in distance. El 71 Lantern resize by 40 c/p and place by tube. El 9 Rose resize by 30 c/p and place behind Lantern to the left. Duplicate Rose twice and scatter as you wish at the bottom. El 19 Pumkin resize by 50 c/p and place towards the left behind Log. El 40 Camera resize by 30 c/p and place by right Lantern. El 56 Bunny resize by 40 c/p and place towards middle by Log. El 84 resize by 30 c/p and place by Lanter to the left. Go back to El 8 FLowers this time resize by 40 rotate right, c/p and place to the fat left. El 51 Ribbon resize by 80 flip horizontal c/p and place to fat right by Log. El 31 Walnuts resize by 30 c/p and place by Bunny duplicate layer and place in front of Lantern. El 16 resize by 50 c/p and place to far left behind 82. Add your drop shadows!
Duplicate tag go to properties Overlay and lower opacity.
Add your name, CR and License
Save as PNG!
Thanks for looking!
post signature

Joker's Wild - CT PTU Tut - Why So Serious by Pink Paradox Productions


I am using PSP X6 to create this tag but any other program or version will work.


Fabous fun kit by Pink Paradox Productions named "Why so Serious"

Awesome art of Arthur Crowe

Mask is by Mille #41

FTU Font
Miele

No Outside Filters Used

HERE WE GO!

Open Image 700 x 700 c/p tube onto canvas. El 107 POW c/p and place towards top right.  behind tube. El 129  Skyline resize by 60 place to the top over POW Layer. El 103 BOOM resize by 50 c/p place towards right, aligning it with Skyline  El 22 Dice resize by 40 c/p and place towards bottom left behind tube. EL 76 Skull resize by 20 c/p and and place by tube. El 124 Gum resize by 20 c/p and place by Skull. Elements Cards "1" and "2" resize by 20 place them as you wish at the bottom. El 30 Bomb resize by 25 c/p and place to bottom far right.  El 41 Money Bag resize by 20 c/p and place towards bottom left. El 166 resize by 10 /p an place to far left by Money Bag, duplicate twice and sprinkle the layers around the bottom. El 161 Mailbox resize by 45 c/p and place to far right behind tube layer. El 125 Rose resize by 15 c/p and place to bottom far right by Card 1, duplicate and place layer by Dice. El 83 Star resize by 20 Free rotate left 10 c/p and place to bottom right behind Rose. Duplicate twice and spread the layers as you wish. El 102 resize by 25 c/p and place to left side behind mailbox. Add your drop shadows!
Merge Visible. Duplicate tag, Enhance Edges lower opacity to 55 also add Properties: Overlay!
Add your Mask. I used Paper 2 for mine, Duplicate mask, place one layer to the left and the other to the right. 
Add your name, CR and license
Crop if needed
Save as PNG
Thanks for looking!
   
post signature

August 19, 2015

Indian Summer - CT PTU Tut Fall by the Fireside by Drea's Creations

I am using PSP X6 to create this tag but any other version will work. 
Beautiful kit by Drea's Creations named "Fall by the Fireside" available HERE
Gorgeous art by Arthur Crowe. You need alicense to use his work and you can get both HERE
Beautiful mask by Dee. I used # 2 from top HERE
FTU Font Qaskin
No Outside Filters Used
Here we Go!
Open New Image 700 x 700, resize tube by 50 c/p onto canvas. C/P tube of choice onto canvas. El 128 Leaf  Frame resize by 80 c/p and lace behind tube. Magic Wand, click inside frame expand by 10, Paper 13 resize by 70 c/p onto frame. Selections invert delete. Duplicate Paper layer, on copy go to properties: Burn and lower Opacity as you wish. Merge down Paper Layers. Move your tube to far right, lets work with inside of Frame. 
El 64 Fence Corner resize by 50 c/p place towards bottom inside frame. Erase any part of the Fence that is showing outside Frame. El 40 Tree resize by 40 c/p and place towards left behind Fence, duplicate and place towards right. El 15 Sunflowers resize by 20 c/p and place behind Fence towards bottom, duplicate flip horizontal and place by bottom as well. EL 57 Puppies resize by 20 c/p and place on Fence Floor. El 90 Blankets resize by 20 cp and place by Puppies. El 49 Fawn resize by 20 c/p and place behind Tree towards Left. El 47 Grass resize by 30 c/p and place towards back behind tree layers, middle of frame. El 59 Water/Ducks resize by 35 c.p and place between El 47 and Fawn. El 48 Deer resize by 15 c/p and place on top by El 47 Grass. El 34 Firewood resize by 20 c/p and place towards bottom by Fence floor. 
Working out side of Frame. El 6 Leaf c/p and place towards bottom of frame behind tube. El 105 Grapes resize by 40 c/p and place towards left on top of Leaf. El 89 Scarf resize by 25 and place by Grapes. EL 23 Pinecone resize by 25 c/p and place towards bottom behind Leaf. El 97 Pumkin resize by 20 c/p and place by Grapes towards right. El 25 Berries resize by 50 c/p andplace toards left side of Frame. El 17 resize by 20 c/p and place behind Grapes to the left. El 112 Books resize by 20 c/p and place by Scarp. Go back to pinecone layer duplicate flip horizontal and place behind Books towards right. El 75 Lantern resize by 20 c/p and place on top of Frame towards left. El 1 Leaf resize by 35 c/p and place to far left of Frame. Add your accents I added the Ribbon and Scatter. 
Add your drop shadows!
MergeVisible. Go to Photo Effects - Film and Filters: Filter Color #d07fa0.
Duplicate tag, on Copy Properties: Overlay lower Opacity to 44
Add you mask. I used Paper 11 for mine! I Duplicated my Maks then Flip Horizontal. 
Add your Name, License and Copy Write info
Save as PNG!
thanks for Looking!
post signature

Vineyard - CT PTU Tut - In THe Vines by BLT Dezignz


I am using PSP X6 to create this tag but any other version will work.

using a Fab kit by BLT Dezignz named In the Vines available here

Gorgeous art by Misticheskaya. You need a license to use her art and you can get HERE

Mask is by Me #2  HERE

FTU Font Al Sandra

No Outside Filters Used

Don't Forget Your Drop Shadows

HERE WE GO!
Open new image 700 x 700, Resize tube by 40 c/p onto canvas. El Barrels resize by 15 c/p and place directly behind tube. Flower 1 resize by 50 c/p and place to the far right behind tube.   Duplicate layer  flip horizontal and place to the up above behind Flower 1. Grape 2 resize by 15 c/p and place to the left . EL Vine 2 resize by 10 c/p and place  towards middle by Grape 2. El Birdfeeder resize by 10 c/p and place between Vine 2 and Grape 2. El Plant resize by 20 c/p and place to the left behind  Elements. El Wagon resize by 40 c/p and place towards middle in front of Flower 1 Layers. El Jug resize by 5 c/p and place behind middle of tube. El Mesh resize by 15 c/p and place towards right behind Wagon. El Butterfly and Chalice resize by 5. C/P Chalice by tube in the middle, c/p butterfly by Lantern, duplicate flip horizontal and place that layer by mesh. El Cork resize by 3 c/p and place by Chalice. El Grapes 1 resize by 10 c/p and place by Butterfly and Lantern, duplicate and place this layer by other butterfly by Mesh. El FLower 1 again this time resize by 10 c/p and place by Chalice . El Swirl resize by 35 c/p and place underneath tube. El Flower 5 resize by 45 c/p and place towards left behind Elements. I duplicated this layer 4 times and just moved the layers to frame around the tag.  Add your drop shadows. Add your Mask. 
Add Photo Effects Time Machine Cross Process
Add your name, Cr and license 
Save as PNG!
post signature