Pages

March 4, 2016

KIT PROMO TEAM! - Sweet and Sexy Flower by Arthur Crowe and Matching kit by Blissful Designs!


****... NEW RELEASES AT ARTHUR CROWE'S FACTORY!...****

Spring is in the air!
He has some beautiful tubes coming out just in time for Spring!
I got to play with a new beauty
"Sexy and Sweet Flower"  and she has a beautiful kit to match her by Blissful Designs!
Visit Arthur's store HERE
Tube HERE 
Kit HERE


Tag I made!


VISIT HIS STORE SOON!


February 20, 2016

Machine Works - CT PTU Letting off Steam by Jackie's Jewels


I amusing PSP X6 to create this tag

Using the newest kit by Jackie's Jewels named "Letting Off Steam". This kit is just beautiful! In regular color browns, tans, golds and a splash of blue!
Exquisite elements and papers!
Visit Jackie HERE 

I am using the lovely work of Misticheskaya available HERE

Mask is by ME and its #17

FTU Font Die Already

Here we go!


Open new image 700 x 700. My tube choice i resized by 45 c/p onto canvas. El 1 Frame c/p and place behind tube. El 12 and 13 resize by 30 c/p and place these elements on your frame towards left. Add drop shadows and enhance edges!. El 47 resize by 70 c/p and the top left, add drop shadow enhance edges.  El 37 resize by 80 c/p and place to far right behind Frame. Duplicate that layer, flip horizontal and place to the left side behind Frame. Now back to the original El 37 tube, now rotate right, c/p to the bottom underneath tube top the left, duplicate flip horizontal and place to the right. You want to  make it look like a ledge.  El 33 c/p and place to the bottom over Pipes. Elements 17 and 19 resize by 30 c/p El 17 and place to bottom far left, El 19 place by tube towards middle. El 31 resize by 30 c/p and place to the bottom right by tube. El 21 resize by 50 c/p and place by Hat. El 29 resize by 35 c/p and place to the bottom left by Lantern. El 52 resize by 25 c/p and place to far left by El 17, duplicate twice and spread those 2 layers. El 74 resize by 15 c/p and place to far left behind clock, duplicate three more times and spread at the bottom as you wish. El 76 and 79 resize by 15 c/p and place to the bottom in front of Book. El 11 c/p and place to far top right behind Frame. I used Paper 8 for the inside of Frame resize paper by 65. last El 34 resize by 45 c/p and place to the middle of Frame.
Merge your tag. Add your Maks I used paper 4 for mine. Merge again. Duplicate tag go to Properties: Overlay and lower opacity to about 48 on copy!
Add your name, CR and license
Save as PNG!
Thanks for looking!

***SOON TO BE RELEASED** Arthur Crowe "Elegant Clover" and Matching kit by Happy Pumpkin Studio


*****SOON TO BE RELEASED******

ARTHUR CROWE'S
Elegant Clover


and a beautiful matching kit by
HAPPY PUMPKIN STUDIO


BOTH COMING SOON TO ARTHUR CROWE'S FACTORY


Tag I made!


February 19, 2016

New Release by Jose Cano - PROMO TEAM - Temperance


***********NEW RELEASE BY JOSE CANO*************

TEMPERANCE
also
Matching kit by 
Blissful Designs


Tube available HERE

Matching kit HERE

Tag I made using Temperance and matching kit!


Thanks for looking!


February 14, 2016

B.A.B - CT PTU Tut - Dangerous Bitch by Pink Paradox Productions


I am using PSP X6 to create this tag but any other version will work.

Using a fab kit by Pink Paradox Productions named Dangerous Bitch available HERE

Awesome art by Keith Garvey available HERE

Filters
Cybia - Screenworks

FTU Font Sick Vice Capital

Mask is #117 by WSL HERE

Here we go!

Open new image 700 x 700, c/p Tube onto canvas, add drop shadow. Frame 22 resize by 60 c/p and place behind tube. Magic Wand click inside Frame take Paper 4 resize by 60, c/p behind Frame, selections invert delete. C/P closeup of tube place to the left side of Frame, hit Delete now deselect. Duplicate tube, guassian blur 6.0 on copy and properties - dodge and lower opacity as you wish. On Paper layer, go to effects, Cybia - Screenworks - Aged Mossiac. El 95 resize by 30 c/p and place to the top middle of Frame. El 80 resize by 25 c/p andplace behind El 95, add drops shadow and enhance edges. El 100 and 101 resize by 30 Free rotate 25 Left, Just decorate as you wish the behind the top frame area,  Elements 75 and 76 resize by 30 c/p ot the top left behind frame, duplicate these layers flip horizontal and place towards the right. Last Elements 135 and 147 Flowers resize by 20 and again I just decorate around top frame and added some flower layers to the bottom as well.. Get Creative!..  El 71 Dice resize by 30. c/p and place to far left, duplicate and stack that layer on top, Merge Down, duplicate flip horizontal and place that layer to far right. El 77 Cards resize by 50 c/p andplace to the far right behind Dice layer.
Elements 16, 21, 26, 27,  66 and 72 resize by 20 c/p and place to the bottom left. El 34 resize by 30 c/p and place towards middle behind tube.
If yiu are happy with your tag great!. Add your Drops Shadows!. I like using Effects-Enhance Edges on some elements like jewelry, charms etc, it just makes them pop  more! Duplicate main tube layer, properties hardlight and lower opacity. Merge your tag! Add your mask, I used Paper 1 for mine,  then duplicate. Merge visible!
Add your name CR, and License info!
Save as PNG!

February 13, 2016

Red Love & Hate - KIT PROMO TEAM - Arthur Crowe and Creations by Sanie


**Play around with this cutie from Arthur Crowe "Red Love & Hate" and Matching kit by Creation by Sanie**


You can get the tube HERE

Matching kit HERE

Tag I made


February 7, 2016

The Perfect Gift - New Release by Arthur Crowe and Matching kit by Lil Miz Brainstorm


**NEW RELEASE BY ARTHUR CROWE AND MATCHING KIT BY LIL MIZ BRAINSTORM**


The Perfect Gift Tube available HERE

Matching kit available HERE

Tag I made!


Timeless Treasures - CT PTU Tut - Memories keeper - Pink Paradox Productions


I am using PSP X6 to create this tag but any other version will work. 

Using a stunning kit by Pink Paradox Productions named Memories Keeper. Beautiful subtle colors of Beige, Cream and a splash of Brown. This gorgeous kit is now on sale at her store!
Available HERE

Beautiful tube by Arthur Crowe
Available HERE

Mask #117 by Chelle HERE

FTU Font Milton One Bold

No outside filters used!

Here we go!

Open new image 700 by 700, i resied my tube of choice by 50 / on to canvas. Frame 14 resize by 62 /p place behind tube, close off tube layer for now. Working with frame, magic wand click inside frame expand by 6, take Paper 8 resize by 60 c/p inside frame, selections invert delete deselect. El 159 Stars resize by 50 flip horizontal c/p and place inside frame towards left side, duplicate flip horizontal again and place towards right side. El 154 Netting resize by 50 rotate right and place to the bottom of frame. Open up tube layer.  El 135 Side Rose resize by 25 c/p and place to the bottom right, El 141 Leaf resize by 25 and place right behind Rose. El 63 Books resize by 20 c/p and place to the bottom by Rose. El 69 Pitcher resize by 25 flip horizontal and place by Books. El 136 Brown Flower resize by 15 c/p and place between Books and Pitcher. El 25 Hat resize by 25 c/p and place on Books El 116 Heart resize by 25 free rotate 10 left c/p and place behind Pitcher. Duplicate Brown Flower Layer and place between the last 2 elements. Duplicate Side Rose  and Leaf layers, flip horizontal both layers and place to the left side bottom. El 134 Front Rose resize by 25 c/p and place towards far right behind Leaf, duplicate and place this later to far left behind Leaf. El 74 Papers resize by 25 free rotate 10 left c/p and place to bottom far left by Frame, enhance edges.. Duplicate Brown Flower again and place to far left behind Papers. El 11 Angel resize by 30 c/p and place behind Paper layer towards middle of Frame. El 108 Jewels resize by 20 c/p and place to far left by Angel, duplicate flip horizontal and do the same to the right side. I decided to add one more Frame so I added Frame 12 resized at 65 c/p and place to back of first Frame. Add your drop shadows! On my main tube layer and both Frames I added Photo Effects - Film and Filters - Vivid Skin Tones - Filter Color #d2bdb9 Custom, Density 30.
I also added this filter to my Mask, using Paper 33.
Merge your tag. add your Nam, License and CR info.
Save as PNG!


February 3, 2016

"Broken Heart" - New Release by Arthur Crowe - Matching kit by KCreations - Kit Promo Team


***NEW RELEASE BY ARTHUR CROWE!***

**Matching kit by KCreations!**


TUT


Mask is by me #24 HERE

FTU FONT Candlescript Demo

No outside Filters used

Here we go!


Open new image 700 x 700, resize tube by 60  flip horizontal c/p onto canvas. Resize Frame 3 by 75 c/p behind tube. El Gift Bow resize by 75 c/p place directly underneath tube and also Flip Horizontal. El Candy 2 resize by 25 c/p and place to the bottom by tube. El Perfume resize by 25 place to the left by Candy. El White Rose 1 reseize by 25 c/p  and place to bottom fat left, duplicate flip horizontal and place to bottom far right. El Black Rose resize by 15 c/p and place by White Rose to the left, duplicate flip horizontal and place by White Rose to the right. El Red Rose 1 follow same steps as wit Black Rose. El Heart 1 resize by 35 free rotate 10 left c/p and place towards left side of Frame behind White Rose. El Lips resize by 25 free rotate right 10 c/p and place behind White Rose to the right. El Love resize by 35 c/p and place to the top middle of Frame behind tube.
Magic Wand, Click inside frame and resize Paper 2, by 60 c/p onto Frame,  flip horizontal, now I want the Heart to show as much as possible so move your paper so that much of the hear is showing., Selections invert delete. C/P close up of tube, hit delete deselect. Duplicate close up tube, properties - dodge. I used El Splatter to decorate around Frame. Add your drop shadows. Merge your tag, duplicate gaussian blur 6.0 properties Soft light and lower opacity I did mine to 60. Add your Mask I used paper 5 for mine. Mask 24. Merge your tag. Add your name, CR and license info
 Save as PNG
Thanks for looking!

January 31, 2016

Enchanted Meadow - CT PTU Tut - Fairy Fantasy - Pink Paradox Productions


I am using PSP X^ to create this tag but any other version will work. 

Using Fairy Fantasy - A beautiful new kit by Pink Paradox Productions. You can purchase this beauty HERE

Beautiful art by Barbara Jensen

Mask is #42 by Millie HERE

Filters
Xero - Soft Vignette

FTU Font Parchment

Here we go!


Open new image 700 x 700. c/p tube of choice onto canvas. I resized my tube of choice by 85. , c/p onto canvas. Frame 12 resize by 58 c.p and place behind tube add a drop shadow, if you are using a sitting tube like mine, place your tube towards right bottom part of frame. El 72 Grass resize by 60 c/p and place towards bottom under tube ;ayer. El 41 book resize by 45 c/p and place by tubes's feet. El 45 Decorative Fruit resize by 45 cp and place toward right underneath tube. El 31 Bottle resize by 25 c/p and place by Book. El 58 Cluster resize by 50 c/p and place towards left side of Frame. El 110 Flower Scatter resize by 30 c/p and place to far right behind El Cluster, now duplicate flip horizontal and place slightly above first Flower Scatter Layer. El 119 resize by c/p and place that behind frame layer towards bottom. El 92 Rose resize by 20 c/p and place to far left behind Decorative Fruit. 
Working with the inside of the Frame, take Paper 45 resize by 60, magic wand wand click inside Frame expand by 10, c/p Paper selections invert delete deselect. On Paper layer duplicate then on copy go to properties screen and lower opacity to about 60. Still working on paper copy layer go to Effects - Xero - Soft Vignette - Horizontal - Invert - Background Color - Diagonal Mesh  with these settings: 8, 7 69, 203 click ok. El 11 Swan resize by 20 c/p and place towards far left center inside frame add drop shadow and enhance edges. El 2 unicorn resize by 35 flip horizontal and place to inside frame up above behind tube add a drop shadow and enhance edges. Last El 75 bubbles resize by 40 c/p and place on background. El 82 Blue Flower resize by 10 c/p and place behind Bottle, duplicate twice and sprinkle the two layers as you like. 
Add your drop shadows.
Add your mask I used Paper 43 for mine.
Merge tag. Duplicate on copy Properties - Overlay and lower Opacity to 44
Add your name, license and cr info
Save as pNG
thanks for looking!

January 30, 2016

Love Struck - CT PTU Tut - Truly Madly Deeply - Pink Paradox Productions


I am using PSP X6 to create this tag but nay other version will work.

I am using a beautiful kit by Pink Paradox Productions named Truly Madly Deeply
Available HERE

Using a lovely tube by Verymany called Little Black Dress  available HERE

Mask is #7 by me HERE

Filters
Photo Effects
Xero - Soft Vignette

FTU Font Bickham Script

Open new image 700 by 700. I resized my tube by 45 c/p onto canvas. Take Frame 16 resize by 45 c/p and place directly behind tube. Take Frame 13 resize by and place directly behind Frame 16. Frame 15 resize by 55 c/p and place directly behind Frame 13. Magic wand select inside Frame 16 expand by 6, c/p you r close up, selections invert delete, take Paper 1 c/p  onto frame hit delete deselect. Duplicate your cloes up tube layer, on copy Guassian Blur 6 then go to Properties Screen, on original close up tub layer go to Properties: Luminance. Back to Copy of closeup tube layer, Go to Effects - Xero - Soft Vignette with these settings:
Horizontal, Sharp checked, Foreground,  Diagonal Mesh
5, -52, 45, 209
then click ok. 
Go to Effects - Photo Effects - Time Machine - Cross Process - Intensity 50 ( you can always play around with the settings)
El 144 Stars resize by 60 c/p and behind Frame towards bottom, duplicate flip horizontal and place the same to far right behind Frame. .
El 109 Black Rose resize by 20 c/p and place to the bottom left by tube duplicate flip horizontal and place to the right by tube. . El 38 Bottle resize by 30 c/p and place to bottom in front of tube layer. El 22 Wine Glass resize by 25 c/p and place by Bottle. El 41 Violen resize by 50 free rotate left 10 c/p and place to the left side of frame in front of stars layer. El 101 Red Rose resize by 20 c/p and place behind Black Rose to the right. El 50 Present resize by 35 c/p and place in between the roses to the right.  Duplicate Red Rose and place that layer by Present. El 15 Hearts resize by 20 c/p and place to bottom far right by Present. El 97 Glitter Trail resize by 60 Rotate Right c/p and place to the far right behind frame layer, duplicate, flip horizontal and place to far left. El 138 resize by 55 c/p and place behind Frame towards bottom left., make sure its peeking from behind the frames.
Add your Drop Shadows!
On my tube layer I added Photo Effects Time Machine Cross Process and lowered opacity to 20.
Add your mask and duplicate.
For the Name, add drop shadow, duplicate and more enhance edges

Merge your tag
Add your name License and CR
Save as PNG!
Thanks for looking!


January 28, 2016

Fast Lane - KIT PROMO - CT TUT - Jose Cano and Exclusive kit by Kizzed by Kelz


****NEW RELEASE BY JOSE CANO AND EXCLUSIVE KIT BY KIZZED BY KELZ

**GWEN**


Here is my tut!


I am using PSP X6 to create this tag but any other version will work.

Newly released tube by Jose Cano "Gwen" available HERE

Exclusive fabby kit by Kizzed by Kelz HERE

Mask is by #117 by Wee Scott Lass HERE

Filters
Cybia - Screenworks - Light Guaze

FTU FONT Sverige

HERE WE GO!

Open up new image 700 x 770, resize tube by 55 c/p onto canvas close off that layer for now. . El 19 resize by 90 c/p and place behind tube. El 11 resize by 90 c/p and place in front of El 19. On both these elements, add drop shadow and enhance edges.  Magic Wand click inside Frame selections expand by 6 c/p texture, selections invert delete DO NOT DESELECT. C/P close up of tube, place to the middle hit delete, c/p regular tube place to the left hit delete againa dn deselect. duplicate that tube layer flip horizontal and place to the right. Merge down tube layers Duplicate and on copy guassian blur 6.0 go to properties screen, on originl tubelayer go to properties then Hardlight and lower opacity. Go to Effects - Cybia - ScreenWorks - Light Guaze. Open up tubelayer. El 27 resize by 50 c/p and place to the bottom of tube. El 29 resize by 30 c/p and place on  top of layer 27. El 12, 20 and 21 resize by 30 c/p and place them towards bottom right. El 7, 9 and 18 resize by 30 and place to the bottom right. El 5 resize by 35 c/p and place to lower left. .  For the background behind Frame. El 22 and 24 resize by 60 c/p one layer towards back of Frame to the top left, c/p seconf arrow layer to the right lower. El 31 resize by 60 rotate left c/p and place to top right behind frame and el 30 resize by 60 rotate left c/p and place to lower left behind frame. El 10 resize by 65 c/p and place to the middle behind Frame, duplicate flip horizontal and place tot he right middle side behind frame.
Add your drop shadows. On original tube layer, duplicate, on copy guassian blur 3.0 properties overlay and lower opacity.

Merge your tag. 
Add your name CR and license info
SAVE AS PNG
Thanks for looking!

January 23, 2016

Written in the Stars - CT PTU Tut - Celestial Destiny - Pink Paradox Productions


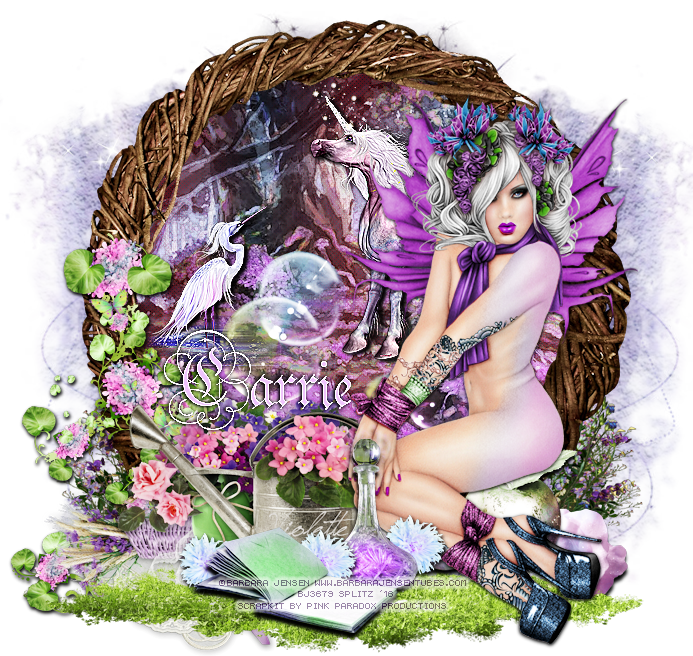
I am using PSP X6 to create this tag but any other version will work!

Using a simply beautiful kit by Pink Paradox Productions named Celestial Destiny! 
This gorgeous kit is now on sale at her store!

Using the beautiful work of Camilla Drakenborg. I first purchased this tube at Up Your Art which is now closed, but I am sure you can find a substitute!
If I can suggest this one by Misticheskaya

No outside filters used

FTU Font Anha

Here We Go!


Open new image 700 x 700, I resized my tube by 80 c/p onto canvas. Frame 21 resize by 65 c/p and place behind tube add a drop shadow and enhance edges. Take Frame 2 reseize by 65 c/p and place behind first Frame, magic wand, click inside that second Frame,take Paper 40 c/p then selections invert delete deselect.  Close off tube layer for now. . El 142 Flower resize by 40 c/p and place towards bottom far left, duplicate flip horizontal and place to far right. El 83 Moon/Sun Frame resize by 60 c/p and place behind first Frame. Magic Wand click inside Sun/Moon Frame and expand by 4, take Paper 21, resize by 60 c/p behind the frame, selections invert delete, take tube at original size c/p and place and place behind Moon/sun Frame towards left, hit Delete now deselect. Duplicate the tube layer, on copy Properties: Screen then on original Gaussian Blur 6.0. El 187 Sparkles resize by 50 and place over first tube layer.
Open up your Original tube layer.
El 160 Netting resize by 60 c/p and place towards far right, duplicate flip horisontal and place to far left . Take El's 26, 30, 44, 41, 77, 96, 128 and 134 resize by 30 and place them accordingly at the bottom of your frame. El 80 resize by 15 c/p and place towards bottom right. El 122 Flower resize by 20 c/p and place towards bottom right behind El 80.
Las el 100 Curtain resize by 50, then free rotate right 20.0 c/p and place to the top left of Square Frame. add drop shadow then enhance edges.. EL 52 Lantern resize by 25 c/p and place to the top of Curtain, take your eraser tool and erase as much of the handle to make it look like its over the curtain, then add a drop shadow and Enhance More. El 17 Butterflies resize by 30 c/p and place over tube, add a drop shadow then enhance edges. Add the drop shadows to your other elements. On tube I added Photo Effects - Time Machine - Cross Process - Intesity 29.

Merge your tag!. Add your name, CR and License info
Save as PNG!

Thank you for looking!


Kiss Me - FTU Tut - Red Hot Lover - Dangerously Delicious Designs


I am using PSP X6 to create this tag!

Using an adorable FTU by Dee Red Hot Lover and you can download HERE. Please do not forget to say thanks!

Using oneof my favorite tubes by Keith Garvey Oh La La. You will need a license touse his art and you can get both  HERE

Mask is by Rachel Set 9 #4 HERE

Texture I used is from Vix #15 HERE

Filters:
Cybia  - Screenworks - Light Guaze

FTU Font Samuella Script

Here we go!


Open new image 700 x 700. I resized my tube by 90 c/p onto canvas. Take Frame 2 c/p and place behind tube. Magic wand click inside frame expand by 6, c/p Texture, selections invert delete, DO NOT DESELECT. C/p your close up tube layers, I am using 2 tubes, its your choice :) now hit delete and then deselect. Merge down your close up tube layers, duplicate. On copy Gaussian Blur 6 then properties screen. On original closeup tube layers go to properties luminance and lower opacity then go to effects Cybia - Screenworks - Light Guaze - Mode 25, then duplicate that layer. El 20 Red Rose resize by 40 c/p and place to the bottom left by tube duplicate and place slight towards middle next to 1st red rose layer and duplicate again andplace to the left (see tag for reference). El 21 Black Rose resize by 40 and place behind left red Rose slightly above, duplicate Black rose and do the to the right side. . El 17 resize by 80 c/p and place to the bottom right, duplicate flip horizontal and place to to the bottom left.  . El 3 Purse resize by 30 c/p and place towards bottom middle of tube. El 1 Shoes resize by 30 c/p and place to the bottom left directly behind tube. El 24 resize by 30 c/p and place to the left of Purse, duplicate flip horizontal and place between red and black rose. El 4 Bustier resize by 40 c/p and place to the right side behind directly behind tube. El 11 Butterfly resize by 20 c/p and place to the background left not far from tube, duplicate twice and scatter these two other layers (see tag for reference). Merge down your butterfly layers, drop shadow then enhance edges. Take the WA, resize by 60 /p and place towards bottom of tube. On your Original tube layer, add your drop shadow then Duplicate  and bring that layer in front of WA. Working on this same layer, Take your eraser tool and erase the tube's leg on the left side. I duplicated both my main tube layers and on copy did Properties:Overlay.
Add your drop shadows to other elements.  Merge Visible. Add your mask I used paper 3 for mine, moved towards right duplicated it then flipped horizontal and moved towards left. Crop if needed. 
Add your Name, CR and license info
Save as PNG!

Thank you for looking!

January 22, 2016

**ARTHUR CROWE** - NEW RELEASES** - CT Promo Team


New Beautiful releases by Arthur Crowe!


Anti Love available HERE


With matching kit by Kissed by Kelz available HERE!


Tag I made!


Love Heart Princess - Available HERE


Matching kit by Creations by Sanie HERE


Tag I made!


January 19, 2016

Sexy Jeans - KIT PROMO TEAM - Jose Cano and Creations by Sanie


Here is my tut!

I am using PSP X6 to create this tag

Using a gorgeous new tube by Joe Cano named Sexy Jeans and a exclusive kit by Creations by Sanie
Both will be available at The Art of Jose Cano


FTU Font Script MT Bold

Mask is by me HERE

Filters:
Penta - Color Dot

Here we go!


Open new image 700 x700. resize tube by 55 c/p onto canvas. El 1 Frame resize by 60 c/p and place behind tube towards bottom left, duplicate layer and and place above towards top right.  Magic Wand click inside Frame doesnt matter which one, expand by 6 c/p closeup of tube selections invert delete, repeat these steps for the other frame. Duplicate the closeup layers on copy properties screen. Go to Effects and add Penta: Color Dot
Value 90
Distance: 2
Everything else 255

El 6 Chicken Wire c/p and place behind top Frame, duplicate layer and place underneath bottom frame. El 2 resize by 35 c/p and place towards top behind tube. El 18 resize by 80 c/p and place behind bottom frame duplicate and move behind top frame. El 10 resize by 30 c/p and place to the bottom left behind tube duplicate flip horizontal and place to the bottom right behind tube. El 28 c/p and place behind Frame to the right, duplicate flip horizontal and place to the bottom behind frame. El 29 resize by 45 c/p and place to the bottom left. El 25 resize by 20 c/p and place to the bottom left.  El 26 resize by 30 c/p and place towards bottom middle of tube. El 127 resize by 30 c/p and place to bottom right of tube. Go back to El 10 resize smaller c/p and place behind El 25 duplicate again and place beside el 26. EL 11 Sparkles layer resize by 70 c/p and place over Frames. El 12 Butterfly resize by 20c/p and place by frame duplicate flip horizontal and place on other side of frame. Add your drop shadows. To the Roses and Butterflies i also Enhanced Edges. On your tube add drop shadow duplicate, on copy gaussian blur 6.0 properties soft light and lower opacity 61. Add your mask Merge your tag. Add your name cr and license info. Save as PNG
Thanks for looking!

January 17, 2016

Bleed - FTU Tut - Bleeding Love by Candy Treats


I am using PSP X6 to create thistag

Using an FTU Kit by Candy Treats named Bleeding Love and you can get that HERE

Using the beautiful work of Anna Marine

Mask is by Rachel Set 3 #1 HERE

FTU Font Always Beside You

No outside filters used


Open new image 700 x 700, Take Frame 8 resize by 80, free rotate 20 left and  c/p onto canva, add drop shadow enahnce edges. . Take magic wand, click inside frame, selections expand by 5 c/p close up tube and position as you would like, selections invert delete. i did this again with close up tube, just positioned it a little different. Select your second close up tube layer, duplicate guassian blur on copy then go to properties screen. Select your first tube close uplayer go to properties_then overlay and lower opacity as you wish. El Black Paper resize by 80 cp and lace behind Frame. El Flower Frame c/p and place behind Paper layer toward top left.   Flower Frame 3 flrip horizontal and place towards bottom right behind Paper layer. El Gem resize by 50 c/p and place towards top left behind Frame. Going back to your Flower Frames, I used Papers 11 and 12 to fill in. El Black Leaf 2 resize by 60 left rotate 20 c/p and place on frame to the top left of frame. El Leaves 1 resize by 60 c/p and place to he top just behind Black Leaves, duplicate flip vertical and place just below under Black Leaves layer. El Glitter Spill c/p and place to the center in front of Paper layer.  El Ribbon resize by 60 free rotate 20 left c/p and place towards bottom underneath Frame. Last El Doodle, I c/p and placed towards the top right in the background, I duplicated the layer, flip horizontal and and moved that layer towards bottom right. Add your mask i used Paper 4 for mine. Merge your tag, duplicate gaussian blur 6.0 then properties overlay and lower opacity to 48

Add your name, CR and license info
Save your tag as PNG
Thanks for Looking!

CT for Jackie's Jewels - FTU Clusters - PTU Kit Flirtatious


I played around  and made some FTU clusters with this playful beautiful kit by Jackie's Jewels named Flirtatious!


You can get the pretty kit HERE

Clusters


Here are 2 tags I made using the clusters and also using the fab work of Barbara Jensen and Alex Prihodko


Thanks for looking!


Sweetheart - CT PTU Tut - Chocolate and Roses - Pink Paradox Productions


I am using PSP X6 to make this tag but any other version will work.

Its that time for love and chocolate!. Using "Chocolate and Roses" a beautifully made kit by Pink Paradox Productions

Gorgeous tube by Anna Liwanag available HERE

Mask is #1 by me HERE

FTU Font Palace Script MT

Filters
XERO - Bad Dream

Here we go!


Open new image 700 by 700, resize tube by 90 c/p onto canvas. Take Frame 13 resize by 50 then free rotate 20 left, c/p and place behind tube, add a drop shadow then enhance edges, now move over tube towards right of the frame. El 108 Heart Rose Frame resize by 65 free rotate 20 left and c/p and place towards top behind first Frame. Duplicate, flip horizontal then vertical and move layer towards the bottom behind frame. Take your magic wand click inside frame expand by 5, c/p Paper 10, selections invert delete, then c/p closeup of your tube, hit delete then deselect. Duplicate your closeup tube layer, guassian blur 6.0 on copy then go to Properties SCREEN then go to Effects XERO Bad Dream with these settings:

Softness: 128 - Strength: 128 - Colourization: NONE
you can lower the opacity if you wish.

El 95 Feather resize by 40 c/p and place towards bottom left behind tube, go back to El Feather and Rotate right, c/p and place behind left side of  1st Frame towards the top (In between Heart Frame layers), Duplicate that layer, flip horizontal and place towards bottom right behind tube. El 104 Brown Rose resize by 15 c/p and place towards bottom left, i duplicate three times and just scattered them around Frame, I also repeated these same steps for El 103 Red Rose as I did for Brown Rose. El 114 resize by 25 c/p and place behind the Brown Rose layer that is on the bottom left. El 71 resize by 20 c/p and place behind bottome Feather towards left. Take El 32, 38, 39, 44 and 54 resize by 20 an place them accordingly at the bottom. Last El 93 Rug resize by 70 c/p and place underneath your Tube and Elements.
Add your drop shadows, on the Red Roses Layers I added enhance Edges. Finishing touch take El 96 Feather resize by 55 c/p and place in front of your close up tube layer and lower opacity to 65 and I added El 124 Sparkles. On my tube I duplicated layer, gaussian blur 6.0 properties Soft Light and lower Opacity. Merge your tag. Add your mask i used Paper 23 for mine.
Add your name, CR and License. Save as PNG!
Thanks for looking!

January 13, 2016

Sweet Sween - PROMO Tube and Matching Kit - Roman Zaric


I am using PSP X6 to create this tag but any other version will work

Beautiful tube Sween by Roman Zaric and will be released soon!

Matching kit by Designz by Vi


Mask by Dee, 1st one from bottom

FTU Font Quaskin

HERE WE GO!


Open new image 700 x 700, I resized tube by 30% c/p onto canvas. El 42 Door Frame resize by 65 /p and place behind tube. Place your tube as if she was sitting on edge, add your drop shadow close off tube layer for now. Take your magi wand and click on each of the windos on your frame and expand by 5. Take paper 3 resie by 70 c/p onto Frame, selections invert delete. El 34 Deer resize by 60, c/p and place on the inside of Frame towards left, flip horizontal then add your drop shadow. Take Elements 50 to 53 resize by 20 c/p and scatter them around the bottom of your tube. El 18 Flower resize by 20 c/p and place towards far bottom left, duplicate twice and scatter alongside the Bottom Frame behind Tube. El 17 Flower resize by 25 c/p and place to the bottom right of Frame.  El 31 Snow ground resize by 80 c/p and place underneath tube and elements. Go to Effects: Texture Effects: Fur with these settings:
Blur: 25, Density: 90 Length: 10 Density 44 then press ok. 
El 15 Blue Flower resize by 15 c/p and place toward middle by tube, duplicate twice and scatter layers towards back by bottom frame. El 41 resize by 80 c/p and place to the of Frame towards left, duplicate and move that layer towards right then enhance edges on both layers. Finish adding your drop shadows!
Merge visible. Add your mask I used Paper 1 for mine then merge visible again. Effects: Photo Effects: Cross Processing and lower density to about 20.

Add your name, License and CR. Save as PNG!
Thank you for looking!

January 10, 2016

Royal - CT PTU Tut - Valentine Royal by Pink Paradox Productions


I am using PSP X6 to create this tag but ay other version will work.

Using a beautiful kit by Pink Paradox Productions named Valentine Royalty available HERE

Using the fabulous work of Arthur Crowe
You need a license to use his art and you can get both HERE

Mask is by Me and its #2

FTU Font Vivaldi

No outside filters used

HERE WE GO!


Open new image 700 x 700. I resized my tube of choice by 60 % and c/p onto canvas. El 50 Chair resize to about 58 % and place directly behind tube. El 80 Petals resize by 30 c/p and place toards bottom left underneath tube and chair, duplicate layer, flip horizontal and place towards right. El 88 Rose resize by 60 c/p and place towards bottom left behind Chair layer, duplicate flip horizontal and place towards bottom right, duplicate again and place towards top. El 40 Red Gift resize by 40 c/p and place towards far bottom left . El 39 Gold Gift resize by 30 /p and place behind tube towards far bottom right. El 46 Box and El 42 Music Notes resize by 15 /p and place to the bottom of tube. El 76 Stone resize by 30 c/p and place behind Music Noes. El 63 Heart Wings resize by 30 c/p place to the top right duplicate flip horizontal and place other layer towards bottom left behind Red Gift. Add drop shadows on these 2 layers, then enhance edges. El 61 Chain resize by 20 c/p and place on tube's left hand add a drop shadow enhance edges. El 90 Flower resize by 25 c/p and place towards bottom of tube behind Box. El 3 Eagle resize by 25 c/p and place on the arm of Chair towards left. El 104 Gold Leaves resize by 30 c/p and place toward bottom far left, I duplicated this layer 3 more times and scattered them around the back of the Roses. Add your drop shadows!
For my Mask I used Paper 4.
Finishing touch go to Photo Effects: Film and Filters:
Warm Earth Tones: Cooling
Density 10
Add your name, license and copy write save as PNG
Thanks for looking!

Love You Madly - CT PTU Tut - Sweet on You - Drea's Creations


I am using PSP X6 to create this tag but any other version will work.

Using a beautifully made kit kit by Drea's Designs named Sweet On You
Go HERE

Using the fabulous work of Jose Cano. This tube is available at his store HERE

No Outisde filters used

FTU Font Niagara Solid

Do Not Forget Your Drop Shadows!

HERE WE GO!!


Open new image 700 x700, c/p tube of choice onto canvas. Take El 61 resize by 90 c/p and place behind tube. El 64 resize by 50 c/p and place towards top right behind tube. El 101 resize by 50 c/p and place towards bottom left behind tube, duplicate flip horizontal and place towards right. El 40 resize by 50 c/p and place right behind tube. . El 99 and 100 resize by 30 c/p and place to the bottom left. El 24 resize by 25 c/p and place by Wine Bottle. El 100 resize by 25 c/p and place by El 24. El 23 resize by 50 c/p and place towards middle left. El 30 resize by 40 c/p and place over El 23. El 33 resize by 25 c/p and place over El 30, add your drop shadow and then enhance edges. Take your eraser tool and erase the top part of the ring, you want to make it look like its entwined with the bow. El 80 resize by 70 c/p and place towards bottom. El 128 resize by 70 b/p and place towards left side of tube. El 49 resize by 40 c/p place to the bottom right. El 104 resize by 15, free rotate right 30 c/p and place by middle of tube towards right, add drop shadow and enhance edges. Duplicate this layer, flip horizontal and place that layer by Wine Bottle.  Last El 134 sparkles resized by 60 and El 77, i used as mu mask duplicated twice.  Add drop shadows! merrge your tag. Go to Effects: Photo Effects: Film & Filters: Enhanced Red then Custom: Warming Density 10. As always remember you can play around with the filters. 
For the name, i added a drop shadow, then bevel with filter color #ffa4a4 and then enhance edges and duplicated thename layer. Merge visible again
Add your license info, copy write and save as PNG!